
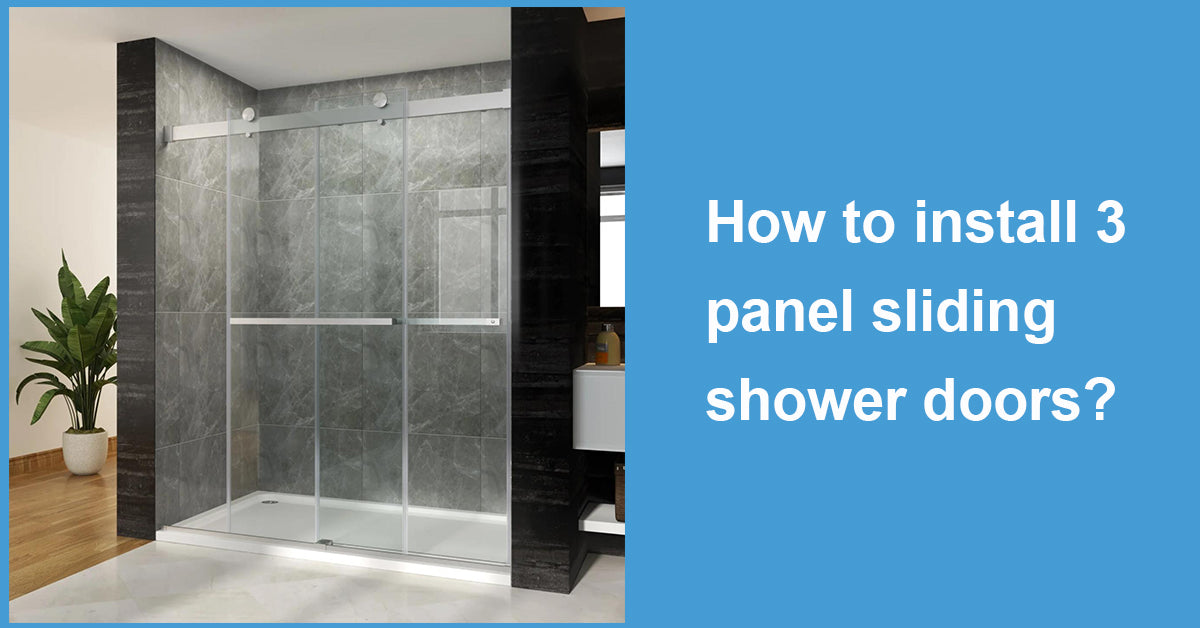
Installing a 3-panel sliding shower door can transform your bathroom into a modern, functional space while providing a sleek look that saves space.
Whether you're renovating your bathroom or replacing an old shower door, understanding the process can help you decide if it's a DIY project you're ready to tackle or if you should call in the professionals.
This article will guide you through the steps of installing frameless shower doors for tubs and ensure a watertight seal to keep your bathroom floor dry and safe.
Understanding the Basics of Sliding Shower Doors
Sliding shower doors, often made of glass panels, glide along a track to open and close. A frameless design offers a clean, seamless aesthetic that can make your bathroom appear larger. Before diving into the installation, it's crucial to understand the components and how they work together to ensure smooth operation and prevent leaks.
Choosing the Right Sliding Shower Doors for Your Tub
When selecting sliding shower doors for tubs, consider the size of your tub, the bathroom's layout, and your style preferences. Measure the length and height of the tub's edge where the door will sit to determine the correct size. Additionally, look for doors with high-quality rollers and a sturdy track system to ensure durability and ease of use.
Preparing for Installation
Before you start, gather all the necessary tools and materials. You'll need a tape measure, level, drill, screwdriver, hacksaw, silicone sealant, and possibly a mallet. It's also helpful to have a second person to assist with lifting and positioning the glass panels.
Measuring and Marking
Carefully measure the space where the shower door will be installed. Use a level to ensure that all markings for the track and brackets are straight. Precise measurements are key to a successful installation, as uneven placement can lead to operational issues and leaks.
Preparing the Tub and Walls
Clean the tub's edge and the walls where the tracks and brackets will be attached. Any dirt or grime can prevent a secure seal, so it's important to start with a clean surface. If there are any old sealant residues, remove them thoroughly.
Step-by-Step Installation Process
Now that you've prepared the area and have your tools ready, it's time to start the installation.
Installing the Bottom Track
Position the bottom track on the tub's edge according to your measurements. Use a level to ensure it's straight, and mark the drill holes. Carefully drill pilot holes, making sure not to crack the tub's surface. Secure the track with screws, and apply a bead of silicone sealant along the inside edge to create a watertight barrier.
Setting Up the Side Jambs
The side jambs are the vertical tracks that support the glass panels. Place them against the bathroom walls, aligning them with the bottom track. Mark the drill holes, then drill and secure the jambs with screws. Apply sealant along the edges where the jambs meet the wall for additional waterproofing.
Assembling the Glass Panels
Lay out the glass panels and attach the hardware, such as the rollers and handles. Follow the manufacturer's instructions for the correct placement and secure attachment.
Installing the Top Track
With the side jambs in place, you can now install the top track. Lift it into position and ensure it's parallel to the bottom track. Once it's aligned, secure it with screws. The top track will guide the glass panels and keep them in place.
Hanging the Glass Panels
Carefully lift the first glass panel and guide the rollers into the top track. Lower the panel onto the bottom track and check that it slides smoothly. Repeat this process for the remaining panels. Adjust the rollers if necessary to ensure smooth operation and proper alignment.
Adding the Shower Door Seal
The shower door seal is essential for preventing water from leaking out of the shower. Attach the seal to the edge of the door that will be in contact with the stationary panel or wall. Make sure the seal is snug and provides full coverage from top to bottom.
Final Adjustments and Sealing
Make any final adjustments to ensure the doors slide freely and are plumb. Apply silicone sealant along the outside of the side jambs and the bottom track to seal any gaps. Smooth out the sealant with a caulking tool or your finger to create a clean, finished look.
Testing and Maintenance
After allowing the silicone sealant to cure for the time specified by the manufacturer, test the doors to ensure they slide open and close without obstruction. Check the seals to confirm there are no leaks.
Regular Cleaning and Upkeep
To keep your new 3-panel sliding shower doors operating smoothly and looking great, clean them regularly with a mild cleaner and soft cloth. Avoid abrasive materials that can scratch the glass or damage the seals. Inspect the hardware periodically for any signs of wear and replace parts as needed.
Takeaway
Installing 3-panel sliding shower doors requires attention to detail and careful measurement, but with the right tools and a methodical approach, it's a project that can significantly enhance your bathroom's functionality and style. Remember to prioritize safety by handling glass panels with care and securing all components firmly. With your new sliding shower doors installed, you'll enjoy a more spacious and stylish bathroom that brings a touch of modern elegance to your home.
By following this guide, you should now have a clearer understanding of the installation process for 3-panel sliding shower doors. Whether you choose to DIY or hire a professional, you're on your way to a more beautiful and practical bathroom space.


Leave a comment
This site is protected by hCaptcha and the hCaptcha Privacy Policy and Terms of Service apply.